Published by
Opsolute Team
on

Introduction
Cloud spending continues to spiral as teams over-provision resources to avoid performance issues, yet AWS reports that up to 25% of cloud costs stem from idle or underutilized infrastructure. AWS Compute Optimizer addresses this challenge through machine learning analysis of CloudWatch metrics, delivering automated rightsizing recommendations across compute, storage, and serverless resources. This guide walks you through everything from initial setup to advanced implementation strategies like AWS Savings Plans, helping you reclaim wasted spend without sacrificing application performance.
What AWS Compute Optimizer Actually Does
AWS Compute Optimizer is a free machine learning service that analyzes your resource utilization patterns and tells you exactly which instances are oversized, undersized, or running optimally. Think of it as having a cost analyst who watches your infrastructure 24/7, comparing actual usage and AWS Cost Management against what you're paying for.
The service collects CloudWatch metrics CPU utilization, network throughput, disk I/O, and memory usage then applies ML algorithms to identify optimization opportunities. It supports EC2 instances, Auto Scaling groups, EBS volumes, Lambda functions, ECS on Fargate, and RDS databases.
Here's what makes it different from basic monitoring: Compute Optimizer doesn't just show you current usage. It predicts optimal configurations based on workload patterns, accounting for performance requirements and traffic variations. When it suggests moving from an m5.2xlarge to an m5.xlarge, that recommendation comes from analyzing 14 days of utilization data across multiple metrics simultaneously.
The catch? It needs data before making suggestions. Lambda functions require 30 hours of invocation history with at least 50 invocations. Everything else needs 14 consecutive days of metrics. No data means no recommendations.
But here's the dangerous part: 14 days can't see seasonal spikes. That rightsizing recommendation perfect for January will crash your retail infrastructure in November. Quarter-end batch jobs, monthly reporting cycles, annual events—none of these appear in a two-week snapshot. This blind spot causes more production incidents than any other Compute Optimizer limitation.
How Compute Optimizer Classifies Your Resources
Compute Optimizer places every resource into one of four categories based on performance analysis:
Under-provisioned: Your resource can't handle current workload. CPU consistently hits 90%+, memory maxes out, or network throughput shows saturation. Performance is suffering or about to suffer.
Over-provisioned: You're paying for capacity you don't use. Average CPU stays below 20%, memory utilization rarely exceeds 30%, and you could downsize without impacting performance.
Optimized: Current configuration matches workload requirements. Usage patterns of AWS Tags show healthy utilization without performance bottlenecks. No changes needed.
None: Insufficient data for analysis. Either the resource is too new, metrics aren't configured properly, or workload patterns are too erratic for confident recommendations.
Each classification includes a confidence score. High confidence means consistent usage patterns over the analysis period. Low confidence indicates workload variability that makes predictions risky.
Before implementing any recommendation, map it against this decision matrix:
High Confidence + Non-Critical Workload: Auto-apply in maintenance windows. These are your safest wins, dev environments, internal tools, batch processors with flexible timing.
High Confidence + Critical Workload: Test in staging first, then apply during low-traffic periods. Production databases, customer-facing APIs, and revenue-generating services need validation even with strong data.
Low Confidence + Any Workload: Collect more data or ignore. Variable workloads with inconsistent patterns rarely benefit from rightsizing. The risk of performance degradation outweighs potential savings.
Medium Confidence + Non-Critical: Apply with close monitoring. Watch application metrics for 72 hours post-change and maintain quick rollback capability.
Classification | Typical CPU Range | Action Required | Risk Level |
Under-provisioned | 80-100% sustained | Upgrade immediately | High - Performance degraded |
Over-provisioned | 0-20% average | Downsize to save costs | Low - Excess capacity |
Optimized | 40-60% average | No change needed | None - Properly sized |
None | Inconsistent data | Collect more metrics | Unknown - Insufficient info |
The performance risk indicator matters more than the classification itself. Compute Optimizer shows whether implementing a recommendation could affect application performance critical information before making changes.
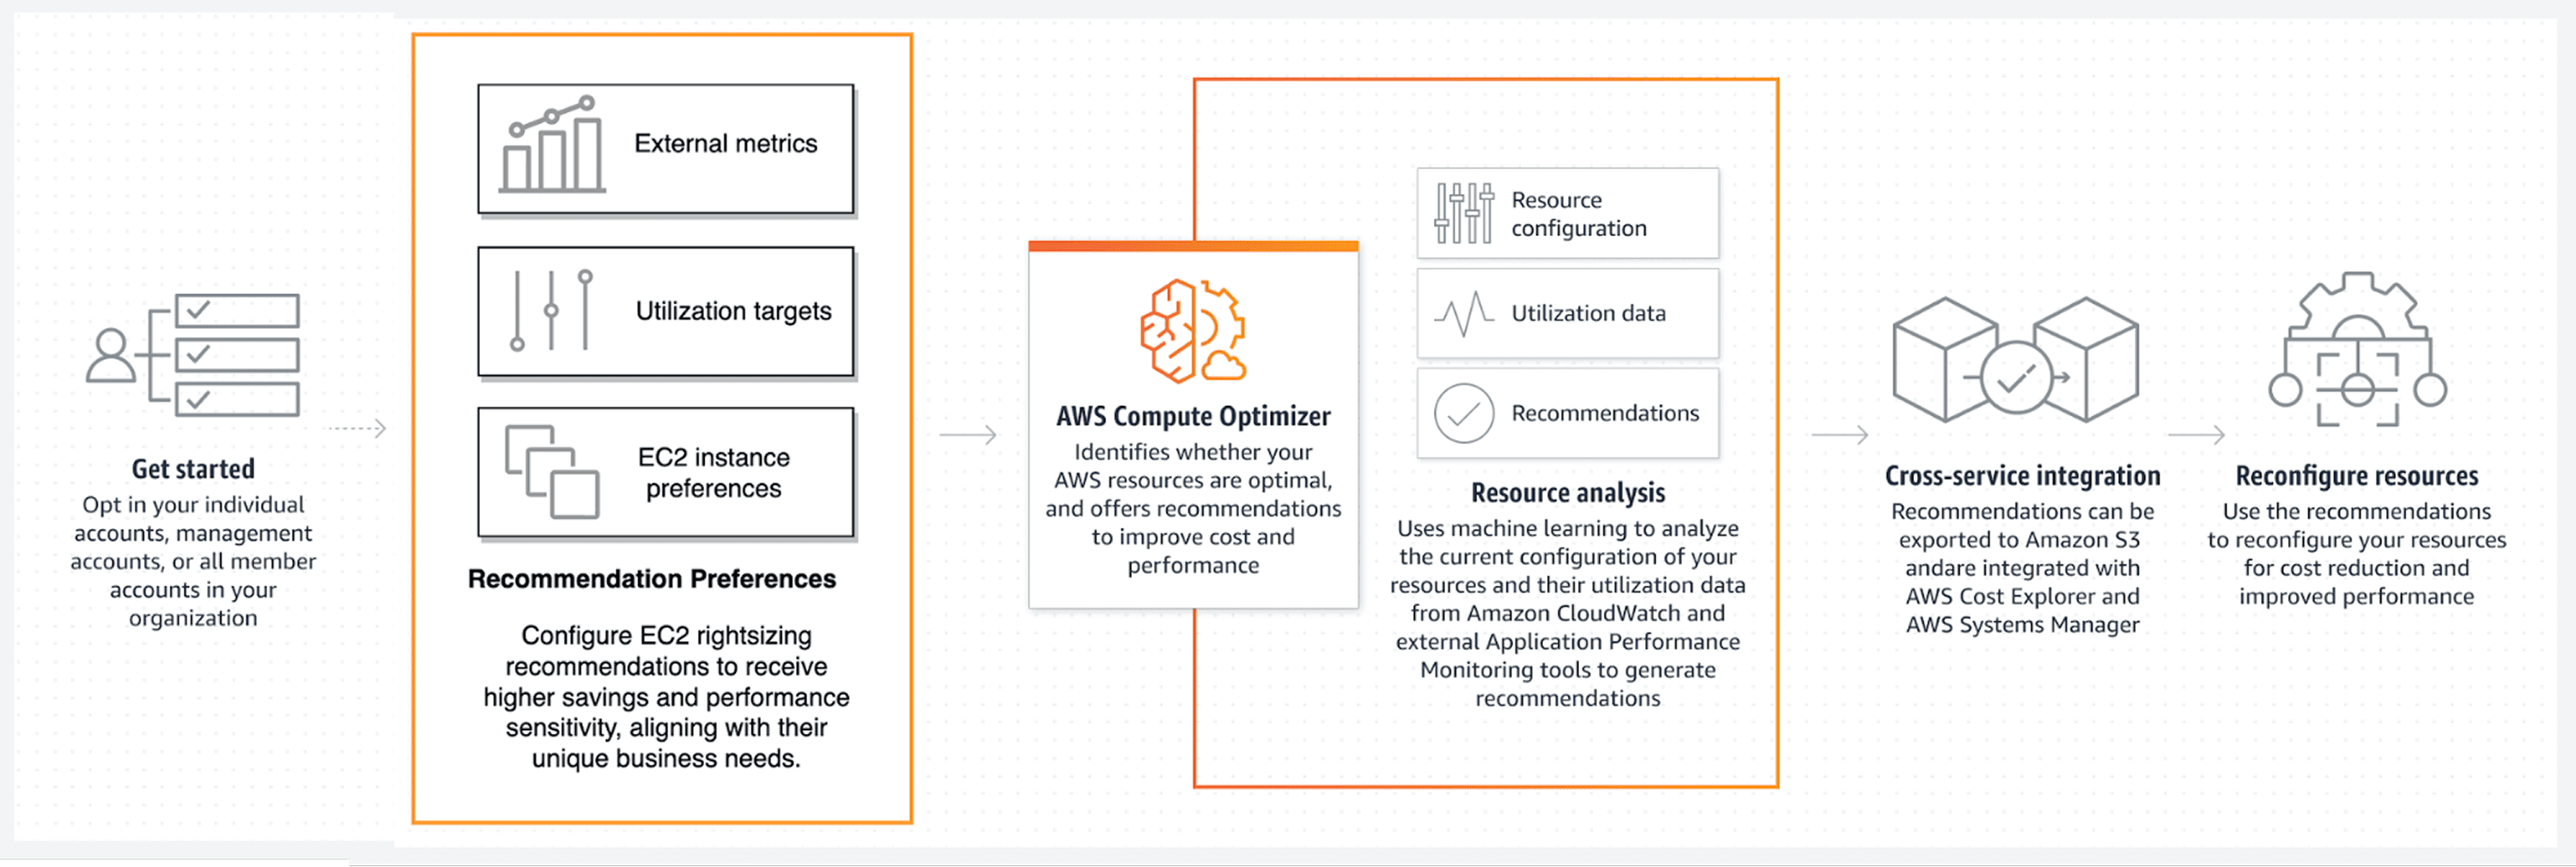
Getting Compute Optimizer Running
Enable Compute Optimizer through the AWS console with a single opt-in. Navigate to the Compute Optimizer service, click "Opt in," and accept the permissions. The service creates a service-linked role automatically, requiring no manual IAM configuration for basic functionality.
But here's the gotcha: EC2 memory metrics don't flow to CloudWatch by default. Without memory data, Compute Optimizer bases recommendations solely on CPU, network, and disk metrics missing a critical dimension of resource utilization.
Install the CloudWatch Agent on your EC2 instances to fix this:
# Download and install CloudWatch Agent |
The namespace must be "CWAgent" for Compute Optimizer to recognize memory metrics. Use any other namespace and your memory data gets ignored.
After installation, wait 14 days. Compute Optimizer needs this full period to establish baseline patterns before generating recommendations. You'll see partial data accumulating in the console, but recommendations won't appear until the analysis window completes.
Understanding Enhanced Infrastructure Metrics
Standard Compute Optimizer analyzes 14 days of data for free. Enhanced Infrastructure Metrics extends this to 3 months at $0.00214 per resource-hour roughly $1.50 per resource monthly.
Why would you pay for longer analysis? Seasonal workloads and periodic batch jobs.
Consider a financial services application that runs heavy processing at quarter-end. Standard 14-day analysis might catch only the quiet period, recommending downsizing that would cripple month-end performance. Three months of data captures the full pattern, preventing costly mistakes.
Monthly cost example: 100 EC2 instances × $1.50 = $150/month. If enhanced metrics prevent one bad rightsizing decision that causes performance issues, you've saved more than the annual cost in avoided incident response and emergency infrastructure changes.
Enable Enhanced Infrastructure Metrics selectively. Start with production workloads showing high variability or known seasonal patterns. Keep standard metrics for stable, predictable workloads like web servers with consistent traffic.
Implementing Recommendations Without Breaking Things
Compute Optimizer recommendations aren't fire-and-forget commands. Each suggestion needs evaluation before implementation.
Start with the lowest-risk changes: obvious over-provisioning with high confidence scores. An instance running at 5% CPU for three months straight? Safe to downsize. An instance bouncing between 40-80% CPU? Needs deeper analysis.
The Pre-Implementation Checklist:
Check application-specific requirements. Does your database need specific CPU features? Does your application require sustained CPU credits that burstable instances can't provide?
Review the confidence score. High confidence recommendations on stable workloads are safe. Low confidence scores on variable workloads need testing.
Test in non-production first. Apply the recommendation to dev or staging environments. Monitor for a full business cycle before touching production.
Plan your rollback. For EC2, take a snapshot before resizing. For Auto Scaling groups, keep the old launch template active until validation completes.
Monitor beyond CloudWatch basics. Application performance metrics matter more than infrastructure metrics during validation.
Never implement all recommendations simultaneously. Batch changes in groups of 5-10 resources. Wait 48 hours between batches. This limits blast radius if something goes wrong and makes troubleshooting easier.
What Compute Optimizer Can't Tell You
Compute Optimizer analyzes utilization patterns brilliantly but misses crucial context. Understanding these gaps prevents optimization mistakes.
Historical Window Blindness: Fourteen days can't capture quarterly spikes, annual events, or long-term growth trends. That perfectly-sized instance might be 20% too small when next month's product launch drives 3x traffic.
No Business Context: Compute Optimizer doesn't know your application architecture, performance SLAs, or cost vs. performance trade-offs. It suggests the most efficient size based purely on metrics, not business requirements.
Custom Metrics Ignored: Using custom CloudWatch metrics for specialized workload monitoring? Compute Optimizer can't see them. It works only with standard EC2, Lambda, and EBS metrics.
Workload Changes: Recommendations assume future usage mirrors historical patterns. Deploying new features, changing traffic patterns, or shifting workload characteristics invalidate past-based predictions.
The 14-day window creates another trap: seasonal businesses. A retailer analyzing instances in January gets recommendations perfect for slow season but catastrophically wrong for November's holiday traffic.
Beyond Rightsizing: When You Need More Than Compute Optimizer
Compute Optimizer excels at single-resource optimization but cloud cost management requires broader capabilities. Organizations need visibility into spending patterns, automated anomaly detection, and cross-team cost allocation that go beyond rightsizing suggestions.
Opsolute extends basic optimization with comprehensive FinOps automation. The platform's Cost Optimization hub aggregates rightsizing recommendations alongside idle resource detection, Savings Plan analysis, and Spot migration opportunities providing a unified view of all optimization levers.
While Compute Optimizer tells you which instances to resize, Opsolute's intelligent automation tracks implementation progress, measures realized savings, and attributes cost reductions to specific teams through its chargeback system. The Forecasting module projects future spending based on actual growth patterns, not just historical averages, catching capacity issues before they become expensive emergencies.
Teams using Opsolute see where Compute Optimizer recommendations fit into broader optimization strategies, balancing rightsizing against Reserved Instance coverage, Spot migration, and architectural changes for maximum impact.
Comparing Cost Management Tools in AWS
AWS provides three overlapping cost tools that confuse even experienced practitioners. Here's when to use each.
Compute Optimizer focuses exclusively on performance-based rightsizing. Use it when you need specific instance recommendations backed by utilization analysis. It answers "what size should this be?"
Cost Optimization Hub aggregates recommendations across AWS services, including Compute Optimizer suggestions alongside Savings Plans, Reserved Instances, and service-specific optimizations. It answers "what are all my savings opportunities?"
Cost Explorer provides historical cost analysis and basic forecasting. Use it for spending trend analysis, budget tracking, and understanding where money went last month. It answers "what did we spend and why?"
The workflow: Cost Explorer identifies high-spending resources. Compute Optimizer determines if those resources are oversized. Cost Optimization Hub surfaces additional savings opportunities beyond rightsizing. Each tool serves distinct purposes in a complete FinOps strategy.
Most teams need all three, but they solve different problems. Don't expect Compute Optimizer to explain spending trends or Cost Explorer to recommend optimal instance types.
Making Compute Optimizer Part of Your FinOps Process
Set up a monthly optimization cadence. First week: review new recommendations and prioritize by potential savings. Second week: implement high-confidence, low-risk changes. Third week: validate changes and measure actual savings. Fourth week: document results and adjust the process.
Create a recommendation approval workflow. Not every suggestion deserves implementation. Define criteria: minimum monthly savings threshold, confidence score requirements, and acceptable performance risk levels. Low-value recommendations create noise without meaningful impact.
Track implementation over time. What percentage of recommendations do you accept? How often do implemented changes cause issues? Which resource types show consistent over-provisioning? These patterns reveal architectural problems, provisioning policies that need updating, or teams that need training.
Integrate Compute Optimizer data with your broader cost management strategy. Rightsizing is one optimization lever among many. Combine it with Savings Plan purchases, Spot migration, and architectural improvements for comprehensive cost reduction.
Frequently Asked Questions
Q: Does AWS Compute Optimizer cost anything to use?
A: The basic service is completely free, analyzing 14 days of CloudWatch metrics at no charge. Enhanced Infrastructure Metrics costs $0.00214 per resource-hour (roughly $1.50 monthly per resource) and extends analysis to 3 months for better seasonal pattern detection.
Q: How quickly can I see recommendations after enabling?
A: Lambda functions need 30 hours of invocation history with at least 50 invocations. EC2 instances, Auto Scaling groups, EBS volumes, and other resources require 14 consecutive days of metrics. You'll see partial data accumulating but no actionable recommendations until the full analysis period completes.
Q: Will Compute Optimizer recommend moving to Spot instances?
A: No. Compute Optimizer focuses on instance type and size optimization within standard pricing models. Spot instance migration requires separate analysis of workload interruption tolerance and different tooling for implementation.
Q: Can I trust recommendations for production databases?
A: Use extreme caution with databases. Compute Optimizer analyzes standard CloudWatch metrics but can't evaluate database-specific requirements like connection pooling capacity, query complexity impacts, or I/O patterns that matter for database performance. Test database recommendations thoroughly in staging with production-level load before implementing.
Q: What if my workload has seasonal traffic patterns?
A: Standard 14-day analysis will miss seasonal variations entirely. Enhanced Infrastructure Metrics (3 months) helps but still won't catch annual seasonality. For workloads with known seasonal patterns, manually adjust recommendations or time your analysis to capture peak periods.
Q: How do I handle recommendations for instances in Auto Scaling groups?
A: Compute Optimizer recommends optimal instance types for the launch template, not individual running instances. Update the launch template, then gradually roll out new instances to test the change. Keep the old template active as a rollback option until validation completes.
Ready to optimize your AWS infrastructure? AWS Compute Optimizer provides the foundation for data-driven rightsizing, but comprehensive cost management requires unified visibility across all optimization opportunities. Schedule a demo to see how Opsolute combines automated recommendations with forecasting, anomaly detection, and team-level cost attribution for complete FinOps governance.
Stop guessing what your AWS bill will be next quarter.
Connect your AWS Organization in under 30 minutes. Most customers see their first chargeback report in 14 days and realize a 5–10× return on Opsolute within 90 days.
